Shellac is Not Bug Poop!
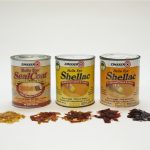
OK, it’s a small thing, but I still get irritated when I see or hear shellac described as bug excretion. It’s not (think of the related word “excrement.”) It’s a resinous SEcretion (big difference) from a bug that feeds off of plum trees, which are native to South Asia. The bug secretes the resin to shelter and protect its offspring. The resin is then harvested and shipped around the world. […]
The post Shellac is Not Bug Poop! appeared first on Popular Woodworking Magazine.
Shellac is Not Bug Poop! Read More »