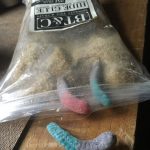
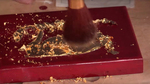
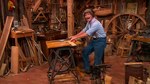
Author name: Enthusiast

Show Us Your Best Dovetail Tricks

overall

The furniture record shows us that “perfect dovetails” is a modern mania. As the photos of antiques above prove, even some of the ugliest joints will stay together for a very long time indeed (perhaps with a nail or two for good measure). But James Krenov? He ruined us. Nowadays, we strive for cutting perfect dovetails, right off the saw. So, how do you get there? Practice…lots of practice. And […]

The post Show Us Your Best Dovetail Tricks appeared first on Popular Woodworking Magazine.

Show Us Your Best Dovetail Tricks Read More »

More on Smart Coatings

Microsoft Word - feula healing 37degc ga 220216

Smart coatings fascinate me. In an earlier post I told you about a paint that uses nanotechnology to cause pee to bounce off walls back onto the shoes of the perp. In another post I told you about a coating that self-heals when exposed to heat or UV light. Here are a few more smart coatings I’ve come across. Researchers at the University of Reading in the U.K. have developed a self-healing […]

The post More on Smart Coatings appeared first on Popular Woodworking Magazine.

More on Smart Coatings Read More »

Design Brief No. 4: The Danish Campaign Chest

pull2

Unlike other furniture designers, I have a handicap. When I design something I am burdened by 15 years of designing furniture for a magazine audience. During those years, I sought to simplify construction and ornament on every piece so that we could fit it into a six- to eight-page article in the magazine. That meant doing away with details that no one saw, designing joints that required the fewest number […]

The post Design Brief No. 4: The Danish Campaign Chest appeared first on Popular Woodworking Magazine.

Design Brief No. 4: The Danish Campaign Chest Read More »

Video: Level a Chair á la Christopher Schwarz

NoFear

About a year-and-a-half ago, Christopher Schwarz got a bunch of woodworkers together for a sawbench building party at John Hoffman’s house outside Indianapolis. Chris was using us as guinea pigs for an upcoming class he was teaching on the subject, and to work out a few final explanatory notes for his “Compound Angles, No Math” article (in the June 2015 issue of Popular Woodworking Magazine) and his  “Anarchist’s Design Book” […]

The post Video: Level a Chair á la Christopher Schwarz appeared first on Popular Woodworking Magazine.

Video: Level a Chair á la Christopher Schwarz Read More »

How to Transfer a Photo to Wood

Image Transfer to Wood

This is an easy way to add some style and texture to your photos. Using this photo transfer technique there will be some loss of quality and some photos will work better than others. You’ll want to choose images with high contrast (dark areas and light areas). Any photographs with lots of detail or made up of mostly mid-tones may not work. The final product will have a vintage look and feel, almost like an old postcard. I chose some clean baltic birch plywood without much noticeable grain pattern so the focus would be on the photos. This is one of those art projects I’ll be experimenting with more and trying to come up with creative pieces using this simple technique. Let me know in the comments down below if you have any cool techniques you’d like to see me try!

Tools and Supplies Used

transfer photo to wood


color laser printer

Step 1: Print Your Photos

I begin by importing all my photos into Lightroom and do some post processing. I cropped mine square and did some Instagram-like adjustments. In the transfer you will likely loose some saturation and contrast so keep this in mind. You will also need to mirror your images as the transfer will reverse your photo. You will need to print your images on regular paper with a dry toner laser printer. Ink jet printers will not work with this technique. If you don’t have a laser printer you can take your files to a local copy shop such as Kinko’s.


matte gel medium

Step 2: Matte Gel Medium

Cut your photos to the size of the board. Using a gel medium coat the printout and the wood with a foam brush. Make sure all area are covered.


transfer photo to wood

Step 3: Place the Photo

Position an place the photo face down on the wood.


squeegee

Step 4: Squeegee

Squeegee out as much of the gel as you can. A plastic scraper or an old credit card works great for this. Let this dry completely for 4 – 8 hours.


wet towel

Step 5: Wet Towel

Once completely dry you’ll then want to lay a wet towel on top and let the water soak in for a good 10 minutes. This will soften up the paper for removal.


transfer photo to wood

Step 6: Wash Away the Paper

We can then take the photos over to the sink and start gently rubbing away the paper. A sponge does help and you don’t want to rub away all the paper just yet because it may start to wear away the image. Once you can start to see the image set it aside to dry again for an hour our so.


transfer photo to wood

Step 7: 2nd and 3rd Rinse

And then you can come back and gently rub it down a second time, let it dry and then one final rinse and rub down. Allowing it to dry between rinses loosens up the paper making it easier to remove without rubbing away the image.


spray lacquer

Step 8: Spray Lacquer

Once that 3rd rinse dries you may still see a tiny bit of haze but a nice wet coat of spray lacquer will take care of that and offer a bit of protection.


transfer photo to wood transfer photo to wood transfer photo to wood transfer photo to wood transfer photo to wood

How to Transfer a Photo to Wood Read More »

Build a Pocket-Hole Jig Picture Frame

Pocket-Hole-Jig-Frame

A few weeks ago, I was asked to build a frame for a 36” x 40“ map of northern Kentucky. I had some leftover maple and decided to build the frame quickly with a pocket-hole jig. It may not be the most sought after joint, and some woodworkers may turn their noses at pocket holes, but it can be an extremely useful joint and can be hidden behind the frame. Ripping & Rabbets […]

The post Build a Pocket-Hole Jig Picture Frame appeared first on Popular Woodworking Magazine.

Build a Pocket-Hole Jig Picture Frame Read More »

Scroll to Top