Nick Offerman on Woodworking, His New Book & More
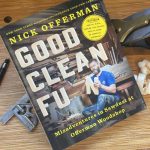
A couple weeks ago – just two days after Popular Woodworking in America, in fact – I had a Skype audio chat with woodworker, author and actor Nick Offerman. His latest book, “Good Clean Fun,” will be released on October 18 (I’ve a review ready to post here when the book is available, and we’ll have “Good Clean Fun” in the store at ShopWoodworking.com – but in short, the book is a […]
The post Nick Offerman on Woodworking, His New Book & More appeared first on Popular Woodworking Magazine.
Nick Offerman on Woodworking, His New Book & More Read More »