Subscribe to my YouTube channel
This week on Make Something we’re going to make this fox masquerade mask out of veneers using a laser cutter. This mask will be made with several layers of veneer. We’ll start off with a layer of walnut topped with a layer of maple, just to give it some thickness and strength. Then I’ll add a layer of offset walnut to give the edges a border and top it off with some maple accent pieces. When I glue them together I’ll use a curved form so when it dries the mask will wrap around the face giving it a bit more dimension. This was a quick fun project. If you don’t have a laser cutter check your local library, art museum or maker space. Here in Toledo, Ohio we don’t have a maker space but our library does offer public access to their laser cutter and gives classes on how to use them. And you don’t even need a laser engraver or cutter to make this. You could do this by hand with an X-acto knife.
I’m able to do what I do because of my sponsors
Products Used in This Video
Thank you to my Patreon supporters for your generous donations!
Do You Like This Article?
 Sign up for my weekly email newsletter and join thousands of others and be the first to know of new content like this!

Step 1: How It Will Come Together
This mask will be made with several layers of veneer. We’ll start off with a layer of walnut topped with a layer of maple, just to give it some thickness and strength. Then I’ll add a layer of offset walnut to give the edges a border and top it off with some maple accent pieces.

Step 2: Drawing in Adobe Illustrator
I drew my mask in Adobe Illustrator. You can download the file here to play around with it in Illustrator or Inkscape if you like.

Step 3: Cutting Veneer on the Laser Cutter
I’ll separate all the elements and send them off to my Full Spectrum Hobby Laser.

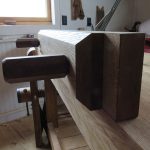
Step 4: Cutting Form on Bandsaw
Once I have all the pieces cut I can begin making my form. I just glued up some scrap 2x4s together to make this 2″ thick block. I’ll then draw a curve on it and cut it out at the bandsaw.

Step 5: Foam Lining
I picked up some foam sheets from my local art supply store that I’ll line the inside of the form with. The sponginess will ensure even pressure when it comes time to clamp it up. I’ll use clear packing tape to attach it which will also prevent the mask from sticking to it if there is any glue squeeze out.

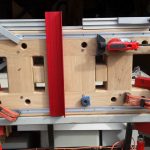
Step 6: Glue Up
The glue up will happen in 3 stages to make sure all our pieces line up correctly. I’ll begin by gluing the first two layers together. They are the exact same shape and the purpose of this is just to add a bit of thickness.

Step 7: Glue Up
Clamp the form together and let it dry for a few hours.

Step 8: 2nd Layer Glue Up
Once the glue dries we can take it apart and add the next layer and clamp it up again.

Step 9: Final Layer Glue Up
The final stage are these accent pieces that I’m gluing in with CA glue. Since these pieces are much smaller I’m using the quick set CA on the maple and spraying activator on the mask for an instant bond.

Step 10: Gluing and Finishing
A few coats of spray lacquer and gluing some ribbons on is all that’s left.


Do You Like This Article?
Sign up for my weekly email newsletter and join thousands of others and be the first to know of new content like this!