Turning the Roy Underhill Way
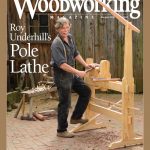
The August 2016 issue of Popular Woodworking Magazine mails to subscribers this week and features two articles on pedal-powered pole lathes. First, a hatless Roy Underhill walks you through steps to building a portable, adjustable, powerful and (considering he uses construction-grade lumber) affordable foot-powered lathe. And a few pages later, Jarrod Stone Dahl shows you how to make handled vessels using a pole lathe’s unique reciprocating motion. You can check […]
The post Turning the Roy Underhill Way appeared first on Popular Woodworking Magazine.
Turning the Roy Underhill Way Read More »