Author name: Enthusiast

Cast Your Ballots in the 2016 PWM Excellence Awards

copper cat drawer pulls

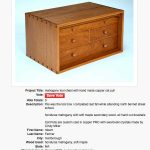
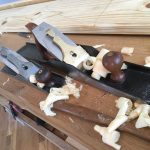
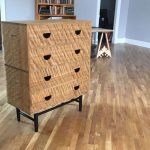
The entry period for the 2016 PWM Excellence Awards has closed – it’s time to cast your ballots for the Readers’ Choice awards in each of the five categories (Boxes & Smalls; Seating; Tables; Casework, Cabinets & Bookshelves; Miscellaneous). Voting runs through 11:59 p.m., June 24. The Readers’ Choice winners in each category (the project with the highest number of votes in each) will be featured in the November 2016 […]

The post Cast Your Ballots in the 2016 PWM Excellence Awards appeared first on Popular Woodworking Magazine.

Cast Your Ballots in the 2016 PWM Excellence Awards Read More »

Yes, You Need a Jointer and a Jack

jack_jointer_IMG_5528

I suspect this will ruffle a few feathers, but so be it. I’ve been asked a lot lately if one really needs a jack and a jointer plane. Several well-respected woodworkers and writers now teach that you can prepare all your stock for finishing with only one bench plane, a smoothing plane, if you use machine-prepared stock. I suppose that’s true in the same way that I could write all […]

The post Yes, You Need a Jointer and a Jack appeared first on Popular Woodworking Magazine.

Yes, You Need a Jointer and a Jack Read More »

Congrats to Allen Moon, PWM 2016 Workshop Makeover Winner!

Congratulations Allen!

Congratulations to Allen Moon of Pelham AL!  Allen was chosen as the winner of the Popular Woodworking Magazine 2016 Workshop Makeover Giveaway. Allen won a new workshop stocked with more than $9,200 of tools from Jet, Bessey and Woodpeckers. Allen is retired after more than 45 years in the healthcare industry. He is also a private pilot, has been woodworking since his teens and would love to have a CNC machine […]

The post Congrats to Allen Moon, PWM 2016 Workshop Makeover Winner! appeared first on Popular Woodworking Magazine.

Congrats to Allen Moon, PWM 2016 Workshop Makeover Winner! Read More »

Removing a Black Scrape on a Car

Here's the black scrape early in the process of removing it.

While visiting my son and daughter-in-law, I noticed that she had a pretty ugly black scrape on the side of her car. She had gotten it when she backed out of a tight parking space and rubbed up against the plastic back bumper on a truck. I decided to win points by removing it. I had to decide between two methods, abrading it off or dissolving it off. Both came […]

The post Removing a Black Scrape on a Car appeared first on Popular Woodworking Magazine.

Removing a Black Scrape on a Car Read More »

Final Design Brief No. 6: The Danish Campaign Chest

curly_oak_chest_635_IMG_5509

I don’t think much about the joinery for a piece until I have the form and details all settled. I do this because I want the joinery and the style of the piece to match. What do I mean by this? We have an excellent cabinetmaker in our area who builds gorgeous Shaker reproductions. But when you open the drawers, they are running on Blum metal slides. Open the doors […]

The post Final Design Brief No. 6: The Danish Campaign Chest appeared first on Popular Woodworking Magazine.

Final Design Brief No. 6: The Danish Campaign Chest Read More »

Dowel Joinery Technique and Tips

Using Dowels for Joinery

There are many ways to join two boards for case work. My favorite and easiest way is to use the Festool Domino. There’s also biscuit joinery, pocket holes and traditional methods such as mortise and tenons. All of these techniques takes expensive special tools or jigs. The method I’m about to show you doesn’t require any specials tools except a drill and a mallet. To make life a little bit easier you’ll want some dowel centers to help you place your mating hole. These dowel centers are very cheap and can be picked up for just a couple of dollars.

dowel joinery

Tools and Supplies Used


dowel pins

Step 1: Dowel Pins

Although you can use regular dowels for this method I find that many of the dowels bought from the home center is slightly under sized and I highly suggest using these dowel pins.


dowel centers

Step 2: Dowel Centers

Using these dowel centers will help you align the mating holes. These little guys will make life much easier and improve alignment.


flag your drill bit

Step 3: Setting the Hole Depth

With a small piece of masking tape you can set the depth of your hole by wrapping it around your drill bit and making a flag. I’m using a 5/16″ bit to go along with the 5/16″ dowel and 5/16″ dowel center.


drilling holes

Step 4: Drilling Holes

Drill the holes where you’d like the butt joint to be in one piece.


dowel centers

Step 5: Dowel Centers

Place in the dowel centers in the drilled holes.


dowel joinery

Step 6: Aligning Butt Joint

Align the mating pieces on the dowel centers and give it a tap with a rubber mallet. This will place a dimple on the mating piece.


drilling holes

Step 7: Drill Mating Holes

Using the dimples drill the mating holes in the second piece.


dowel joinery

Step 8: Add Dowel Pins and Glue-up

Add some glue and your dowel pins and tap the pieces together and you should have a perfect butt joint. Be sure to throw some clamps on and let it dry for a few hours.


Dowel Joinery Technique and Tips Read More »

Scroll to Top